Letters become pixels: exact-area scanline coverage, subpixel RGB and hinting.
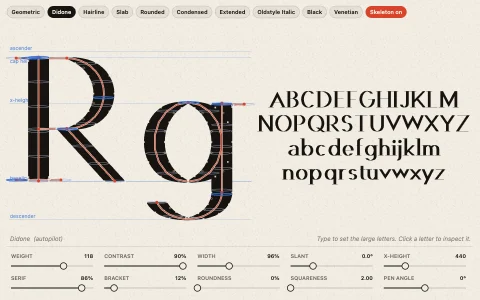
Every letter on the page is generated in code as quadratic Bezier outlines, made by sweeping a pen along skeleton strokes, so the strokes overlap and only make sense under the nonzero winding rule. The rasterizer flattens the curves, cuts each pixel row into bands at every edge endpoint and crossing, sums edge directions across each band to find the gaps with a nonzero winding number, and accumulates each gap's exact trapezoid area into the row with a prefix sum. Zoom from a type specimen down to single pixels showing their coverage, the outline with its on-curve and off-curve points, and a scanline that marks the winding number between crossings. Subpixel mode rasterizes at three times the horizontal resolution and filters it onto the red, green and blue stripes of an LCD, and a small autohinter snaps zones and stems to whole pixels.
Try it. Scroll or use the + and - buttons to zoom, and drag to pan. Up close, drag any point to reshape that letter everywhere it appears, and hover a pixel to see the exact area covered inside it. The chips (or S, H, G, O, I and F) switch subpixel rendering, hinting, gamma, outlines, light on dark and the serif or sans style. Space jumps to the next stop of the tour.
Paste this into Claude Code, Codex or any coding agent to get a simple version running, then take it wherever you like.
Build a glyph rasterizer explorer with JavaScript and the HTML canvas element. Put everything in a single index.html file with no libraries or build step, so I can open it directly in a browser.

Start simple:
- Define one letter yourself as closed contours of points, TrueType style: on-curve points joined by straight lines or by quadratic Bezier curves through off-curve control points. An "o" (an outer and an inner contour wound in opposite directions) is a good first letter, then something with overlapping contours.
- Flatten the curves into short line segments, each tagged with its direction (+1 going down, -1 going up).
- Write your own rasterizer for a small grid, say 16 by 16 pixels. For every pixel row, walk across the row summing edge directions to get the winding number, and treat any nonzero winding as inside. Start with one sample per pixel, then switch to exact area coverage: accumulate the signed area each edge covers in each cell of the row, and turn it into coverage with a running sum (the trick font-rs and stb_truetype use).
- Draw the grid magnified, each cell shaded by its coverage, with the outline and its points drawn on top in a bright color.

Once that works, make it beautiful:
- Render a word at real size as well, so you can compare the giant pixels with what a reader actually sees.
- Print each cell's coverage when the cells are large, and let me drag the control points to reshape the letter and watch the pixels update.
- Add smooth zoom with the mouse wheel around the pointer, from actual size up to a few pixels filling the screen.
- Add a toggle for gamma: blend coverage in linear light versus naively in sRGB, and see how the weight of the text changes.

Explain the key ideas in short code comments. When you're done, tell me how to open it and suggest three directions I could take it next, such as subpixel rendering on LCD stripes, snapping stems to the pixel grid (hinting), or caching rasterized glyphs per size and subpixel offset.